_____________________________________________________________________
In this session my aim is to show you some of my methods and ways of thinking when I approach editing an image.
You do not need the newest Photoshop to do the things I am going to show you. You can actually do them in Photoshop Elements and previous versions of Photoshop right back to version 6!
I am going to cover:
- Layer Masks (Using a brush)
- Layer Masks (Using the gradient tool)
- Spot Healing brush
- Black and white conversion
Here are few applications for these techniques:
- Removing someone or something from the shot.
- Creating an image that is impossible to take.
- Merging two focus points.
- Blending exposures.
- Blending random images.
- To gain additional tonal ranges in colour and black and white images.
- Removing lens flare, dirty, dust, hair from your shots.
Ok, step one requires some music; without music I cannot concentrate long enough to finish things.
Photoshop
What is Adobe Photoshop? If you have never heard of Photoshop it could be because you have been living in a cave or perhaps you use an alternative like Adobe Lightroom.
Photoshop is a graphics / image editing program Photoshop used by millions of people. In most cases, people edit their work. I personally have only uploaded 1 shot to Flickr with no editing! Some people say it's cheating and you should learn to do it on the camera. I say there are just some things you cannot do on the camera that Photoshop can do, so I will show you a few of my favourites.
Key Commands
Here are the only key commands that I use they will save you a lot of time.
UNDO!!! - CTRL+Z
Select all - CTRL +A
Deselect all - CTRL + D
Copy - CTRL+C
Paste - CTRL + V
ZOOMs in and out - ALT + Mouse wheel scroll
Moves Up and down - SHIFT + Mouse Wheel scroll
Moves Left and Right - CTRL + Mouse wheel scroll
Decreases brush size - [
Increases brush size - ]
Layer Masks
What is a layer mask?
A layer mask is a non destructive layer; it allows you to hide sections of an image. Two important points about a layer mask
1 - The colour black on the Layer mask hides the pixels in the linked layer.
2 - The colour white on the Layer mask leaves the linked layer intact.
I have two ways of doing layer masks, both are useful in different situations.
The first way I will show you is the way I was first taught from a tutorial back in the day. It involves using a mask and a brush to remove areas of a photo.
The second is one I sort of worked out myself (Not in any way claiming I invented it LOL). This way uses a layer mask along with the gradient tool. This method is my sneaky way of keeping gradients of colour and tone without creating those harsh lines that usually make something stand out that has been cut and pasted in.
Layer Masks #1
My aim of using layer masks is to merge two images together to create one seamless image, which contains elements from both images. In my example, I will merge two images together to create one image containing the same car twice. Other examples of doing this could be to remove something from a shot like a person or an object.
First take 2 images that you want to blend together, copy the image of one onto the other. So CTRL + A then CTRL + C, select the document you want to copy it into and CTRL + V. You should end up with something like this.
1

Next stage is nice and easy, click the top layer and then choose the add layer mask option from the bottom panel. A white square should appear next to top layer in panel indicating linked layer.
2

Now we need to actually see what we are working on; by reducing the opacity on the top layer we can see the layer below without having to keep clicking on the hide layer option. Click the opacity option and drop it until you can see the subject matter behind that you are going to blend. I usually put it around the 50% mark.
3

Get yourself a soft brush and choose a size that will be easy to use when you are painting in your image. Remember to use the [ ] keys once you have selected the brush, this will increase and decrease the brush size without having to click. (I really am lazy). The hardness determines how sharp/soft the brush will be. If you use a really hard brush you can generally see crisp lines. Unless the rest of your image is really crisp you do not want this.
4

Now we need to zoom in (ALT+ Mousewheel) and get close to what you are going to blend through. With your paint brush tool selected and set to black, simply paint over the area you want to see. If a big black circle appears CTRL+Z!!!! and make sure you have the layer mask selected.
5

Now all you have to do is zoom out (ALT + Mousewheel), change the opacity to 100% and bobs your uncle you have a layer masked image. It's easy when you know how!
6

Layer Masks #2
Now for something a bit special!
If you like long exposure then you will know that sunlight can be your friend and your enemy. You need it to create shadows and texture in an image but too much and you lose detail in the sky or in my case the whole sky.
I am going to recreate a sunset shot I took in Mumbles Swansea UK.

Take 2 images; 1 under exposed and 1 over exposed. You are probably already thinking this is some kind of HDR thing, well sort of, but without all the faff of the scroll bars or random effects. This is having a dynamic range but you get to pick what areas you want to use.
7

8

Like the first layer mask tutorial, we need to put the images into the same document so again CTRL + A, CTRL + C, select the document to put the image in and CTRL + V. Once you have done that add a layer mask again to the Top layer
9

Then take the gradient tool, this is the magic tool that will allow you to keep a range of tones and reduce sharp edges where tones are completely different.
10

Make sure the gradient tool is set to black to white using the colour setting in the top left of the screen. Then drag the gradient tool from the top to the bottom of the section you want to blend. The longer the line the more of a tonal range you will keep, the shorter the line the sharper and more blunt the gradient will be.
It usually takes me a few goes to get the blend of the layers how I like them. If you want to guarantee a straight line hold down the SHIFT key when drawing the line, this will lock it.
11

Here's what happens if you draw a short line using the gradient tool.
12

Here is what it looks like when you do not think about what you are going to blend using the gradient tool. You can see it creates a sharp line and the angle of the merged documents do not compliment each other.
13

If you have created a nice smooth gradient you will be able to see it by holding ALT and clicking on the layer mask it will show you the gradient layer behind.
14

Just click back on your image to get out of the layer mask. Looking at the layer mask from time to time will allow you to see if you have missed any areas when using the brush tool. They will show up as white areas within the black.
If you save the file as a PSD, you will be able to return to the image and any layer masks you have created will still be there. If you save the file as a Jpeg, then it will flatten all your layers and you will not be able to change it. Unless you are confident that your image is how you want it do not apply the layer mask or flatten the layers, as you will not be able to get back to them unless you have access to them in your history.
Spot Healing
I use spot healing to take out the mess that lives on my sensor and filters and lenses. Without this little tool I would have to get my camera equipment cleaned every week.
I also use spot healing to remove lens flare.
I find the key to using the spot healing brush is the direction and point where you start from.
Take an image you need to fix, I've found one with some lens flare from the moon.
15

Next, choose the spot healing brush tool. For this example I will not use the content aware fill option which is available in photoshop CS5.
16

I find the best way is to start away from the detail. In this case the detail is the tree. I will start from the top working down and across until I reach the area closest to the tree. The reason I do this is I think the program starts filling in pixels from where you started. As the spot healing brush is set to proximity match it will take the information from pixels around the brush. If you start by the tree you will be moving the tree up the image, instead of bringing the sky to the tree.
This is what happens when I go from top to bottom.
17
This is what happens when I go from bottom to top.
18

As you can see one brings the sky, the other brings the tree. Give it a try yourself next time you are using it. Colour in different directions, it should give you different results.
Black and white Editing
I went through a long phase of using Silver Effects Pro www.niksoftware.com/silverefexpro/usa/entry.php
But ever since I got the CS5 I haven't felt the need to use it. This is mainly due to the improved black and white facilities in Photoshop CS5.
I am really one for trial and error with black and white conversion as there are so many variations you can create. So this will come down to personal preference more than anything I can tell or show you.
I am going to show you how I processed the following shot that was a HOF Winner in week 48.
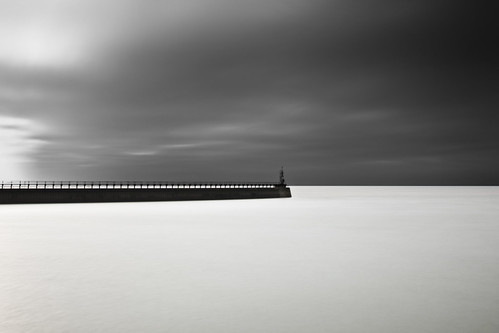
For this shot I used two images, both taken using an ND10 filter for an uber long exposure, to create soft clouds and white sea. One shot is over exposed and the other is under exposed. This way I get the white sea but keep the dark contrast of the clouds.
19

20

Now we need to merge the two shots together. I'm going to put the dark image on top. If you were to put the lighter image on top you would need to do the gradient fill the opposite direction.
So CTRL+A, CTRL+C, select the image you want to paste into and press CTRL+V. Once this is done, add a layer mask to the top layer, select the gradient tool from the left hand menu, and make sure it is set to black and white in the top menu section.
21

Now we need to add the layer mask gradient, make sure you have the layer mask selected by clicking on it in the bottom right layer menu. In my example I want the white sea to show through so I will drag the gradient tool up. I want a sharp line so by holding down SHIFT and dragging a small line on the horizon I will get the desired effect.
In my previous example I dragged a longer line; this was to preserve tones. I do not need to keep tones. In this example I want bold crisp contrast between the sea and the sky so the sharpest edge possible without looking too sharp. (It's quite a fine line between what's good and bad, it took me about 10 attempts to get it how I wanted it)
22

Now the fun part, adding the black and white adjustment layer. This is done by clicking the black and white option on the menu on the right. If done successfully a new layer will appear in the bottom right layer panel. And a new menu will appear replacing the adjustment layer. This menu contains sliders which adjust the colours in your image by moving these up and down you are able to get different effects.
Because my sky was made up of blues and pinks, if I move the red, cyan and blue sliders towards the darker end of the spectrum it will increase the contrast of image making the sky darker. By moving the yellow slider up I am able to make my water and lighter areas of the sky brighter. (Remember, this is all personal taste and trial and error)
23

We are now going to make certain features stand out a bit more to create more depth and increase the contrast without affecting the whole image.
We are going to do this by using the dodge and burn tools. Burn, if you couldn't guess, is going to make things darker and dodge is going to make things brighter. They work by increasing the exposure of tonal ranges and are affected by the size of the exposure you set and how many times you go over an area.
Select the dodge tool from the left hand menu and pick the tonal range that you want to affect from the top menu. I want the sky to go darker; as it's already dark I want to affect the shadows. You also need to set the exposure to be a low figure, to start I usually try 10%. And make sure you have the correct layer selected from the layer menu.
Start drawing over areas that you want to go darker. I am going to accent the edges of a few of the darker clouds. If you find it isn't doing much increase, the exposure or you have picked the wrong tonal range to affect.
24

Magic beans burning is done. I'm pretty happy with that! (BTW trying to replicate a previous image is near to impossible!). What I want now is the dodge tool again selected from the left menu, with the tonal range and exposure on the top section.
I want to make some of the grey clouds a little bit more white, and also get rid of the grey patch in the sea in the bottom right.
This time I choose mid-tones as the range and pick the layer with the sea, and just draw over the sea in the bottom right until it stops looking so grey. Next I want to again accent some of the clouds but this time the grey/white areas. I still need it set to mid-tones and the exposure is ok around 12% (you will get used to judging these and if you don't, CTRL+Z). By drawing over some of the grey clouds I can make them lighter and increase the contrast (Find me a camera that can do that!)
25

Now we can see the final image, darker clouds lighter sea with accented clouds for depth. Every black and white image I do is different as it all depends on the original colours of the image.
Give it a try - find any image and play around with it. Sometimes the best images come by accident.
26

Hopefully this session has helped a few people and maybe refreshed the skills of others. There is so much more I could go through and there's probably a lot others could show me.
The main aim for me was to pass on some knowledge and to get members of the group to give something new a go.
I am looking forward to seeing what people produce after reading this.
Thanks for reading
Andrew
No comments:
Post a Comment